There’s a good chance you’ve done at least a little online shopping on Amazon.com. Amazon has started a program called Amazon Smile, which allows a percentage of each eligible purchase to be donated to the charity of your choice. More good news, you can support the East Greenbush Community Library with each eligible purchase!
To begin, go to smile.amazon.com and sign in with your regular Amazon account.
Next, you will be asked to choose a charity you’d like to support. If you would like to support the East Greenbush Library, you can type in East Greenbush Friends of the Library.
Next, click the select button next to the charity name.
Once your charity of choice has been selected, you will see a confirmation message. After you make your first eligible purchase, you can see the total amount of how much has been donated to your selected charity through Amazon Smile.
If you would ever like to change your charity selection, from the Amazon Smile homepage, mouse over where it says Hello, (Your Name) and click on the Amazon Smile link.
Have you tried out Amazon Smile? Let us know in the comments!
If you’ve used a web browser on a laptop or desktop computer, chances are you have been prompted to save your password when logging into a website site for the first time. It’s a convenient tool when browsing because as we all know, there are so many passwords to remember. But what happens if you saved a password a long time ago and can’t remember it? Good news! In all the popular browsers (Firefox, Chrome, Safari, and Microsoft Edge), there is an easy way to reveal these saved passwords. Security note: if you are saving passwords in a browser on a shared computer, others may also be able to access these passwords using this method.
Firefox
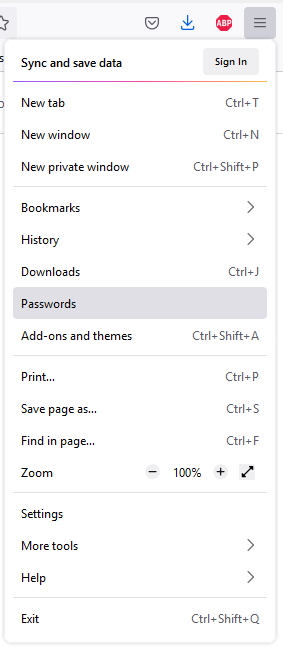
In Firefox, click on the three lines in the top right corner, to the right of the address bar, and then click Passwords.
You’ll see a list of all your saved passwords. If you have a large number of saved passwords, you can also search for a specific site in the top search box. Each entry will have the website where your password was saved, along with the username, if applicable. Clicking on one of the entries will give you more details.
You can see the website in bold. Clicking on edit will allow you to change the username and/or password associated with that site. If you want to delete this saved password, click on remove. You can copy both the username and password. To reveal the saved password, click on the eye icon next to the password field. You also have details about when the saved entry was created, modified, and last used. If you make any changes, click on the save changes button, which will appear if you click edit.
Google Chrome
In the Google Chrome browser, click on the three dots in the top right corner, and then click on settings.
Next, click on Autofill on the left, and then Password Manager.
On the next screen, you’ll see your list of passwords. There is the option to search to find a specific password. You can also turn off Chrome prompting you to save passwords by clicking the blue button next to Offer to save passwords. Chrome also gives you the option to automatically sign in using saved credentials. Clicking check passwords will allow you to see if Chrome considers your passwords weak and to see if your password has been compromised in a data breach.
Under Saved Passwords, you will see the website, username, and password. To reveal the password, click the eye icon. With Chrome, you will be prompted to enter the password you use to sign into Windows or Mac as an extra layer of security. Clicking on the three dots will give you the option to change, edit, or remove that particular saved password. Chrome will autosave any changes you make on this screen. You can add a new saved password by clicking the add button. You can import or export your list of saved passwords by clicking the three dots next to the Add button.
Safari (Mac/Apple Browser)
In Safari, click on Safari in bold on the top taskbar, and then click Preferences.
Next, click on the Passwords tab. You will be prompted to enter the password you use to sign onto your Mac at startup as an extra layer of security.
From here, you will see your list of passwords on the left. If you click on a particular entry in the list, you will see the website URL, when it was modified, the user name, and the password.
To view the saved password, move your mouse pointer over the black dots in the password field. You can also see it by clicking the edit button. Clicking the edit button will also allow you to edit the password or remove it. Clicking the share icon will allow you to share the password via AirDrop if another Apple user is nearby.
Additionally, if you click on the website name in the list on the left, you can click the minus button on the bottom to delete the password. Clicking the plus icon will allow you to add a new website and saved password. If the Detect compromised passwords option is checked, when you click on a particular entry and there are issues with the password, you will see a message that says “easily guessed password” or “compromised password.” Compromised password means that particular password has appeared in a data leak, which puts that account at high risk of compromise.
Edge (Microsoft Windows browser)
The Edge browser in Windows uses an icon that looks like this:
The website How-To Geek has written up some great instructions on how to view your saved passwords in Edge.
Have you tried out any of the methods described above to view a saved password? Let us know in the comments!
Have you ever been watching Netflix and wanted to find a specific category within a genre? Now there’s a solution.
Frequent users of Netflix may have noticed that Netflix sometimes has some very specific categories on their home page. For example, you may have seen something like, “Futuristic Sci-Fi Movies with a Strong Female Lead.” If you’d like something else, or something not so specific, there is a better way.
Get the Hidden Netflix Codes
Dating back to its DVD-only days, Netflix uses codes to classify each of its categories, ranging from broad (Drama), to more specific (Imaginative Action Sci-Fi and Fantasy). These codes stuck around, with more being added through the years. But the question is, how do find the codes and access the content?
Luckily, the website Netflix-codes.com has written a how-to guide and included a sample of common codes within each genre.
Using the Codes
There are a few ways you can access the content on Netflix.
Using a Laptop or Desktop
You can use a laptop or desktop and open up the website in a browser such as Firefox or Chrome. Once you have the category code, you can enter it in your address bar:
https://www.netflix.com/browse/genre/INSERTNUMBER
The “What’s on Netflix” site has a searchable list of all 4,000+ codes. If you are accessing the codes from a link on Netflix-Codes.com or the What’s on Netflix site, you can click or tap on the category name and it’ll open that way.
Using a Mobile Device
If you are using a browser on a device (such as an iPad) that has the Netflix app installed, clicking or tapping on the category name will open the Netflix app to that specific category. Keep in mind that the searchable list of codes may have category codes that don’t currently have any titles in your specific region.
Using a Smart TV or Roku
If you access Netflix on a smart TV or a device such as a Roku, the best way that I’ve found is to find the specific titles you’d like to watch on a web browser, and then add titles to Netflix’s Your List queue by clicking or tapping the plus button on your selection.
Then, when you open up Netflix on your Roku or another device, you can start playing the title from the My List row, which usually appears at or near the top of the Netflix home screen. Depending on the version of Netflix you use, there may also be a shortcut to My List at the top of the screen or by accessing a menu by moving the selector all the way to the left side of the screen.
Have you tried searching for a particular Netflix code? Let us know in the comments.
Have you ever opened Safari, the web browser on your Apple device, and noticed lots of open tabs? There is a built in feature on iOS devices that allows you to have open tabs automatically close after a certain period of time. Having too many open tabs can sometimes slow down the device.
To see how many tabs you currently have open, tap on the Safari icon, which looks like a blue compass:
On an iPhone, tap on the two squares in either the top or bottom gray bar:
On an iPad, tap on the four squares icon on the top right:
Once you tap either of those icons, you’ll see a screen that shows all of your open tabs and the total number of open tabs. On those screens, you can tap the little X in the corner of each tab preview to close that particular tab. When finished on this screen, tap done to return to the previous screen.
iPhone Display of Open TabsiPad Display of Open Tabs
A long press (holding your finger down on the icon instead of a quick tap) on either of the icons mentioned above will give you more options, including the ability to close that specific tab or close all of your open tabs.
To have your device automatically close any open tabs after a set period of time, tap on Settings and then Safari. Scroll down to the tabs section and then tap on Close Tabs.
You have the option to have Safari automatically close tabs after one day, one week, or one month. A blue check will be next to whatever option is set.
Have you tried out this feature? Let us know in the comments.
If you have a Kindle and use the Libby app, you may have been wondering how to send e-books to your Kindle.
Libby is an app made by OverDrive that allows you to browse for and read and listen to e-books, digital audiobooks, and digital magazines. If you have a Kindle, you also have the option to checkout e-books and read them on your Kindle device.
To get started, open the Libby app on your phone or tablet, which is available on iOS (Apple) and Android devices. If you have a Kindle Fire or another device that does not support the Libby app, you can go to https://libbyapp.com/
Once the app is open, click on the shelf icon on the bottom of the screen.
Next, find the book you want to send to your Kindle and tap or click on Read With.
If this is your first time accessing the book after borrowing it and there is no “Read With” text and it only displays “Open in Libby,” that means that particular e-book is not available in Kindle format. If you have previously opened the book within the Libby app and would like to send it to your Kindle, tap on “Manage Loan” and then tap on “Read With.”
Next, tap on Kindle.
From here, a browser window will pop up prompting you to log in to Amazon if you aren’t already logged in. Once you are logged into Amazon, you’ll see a screen with more info about library loaning as well as a “Get Library Book” button.
If you have more than one Kindle or device with a Kindle app (for example if you have the Kindle app installed on your phone), you will have the option to choose where you’d like to deliver the book.
Above the Get Library Book button, the email address you use to log in to Amazon is displayed. If that is not the email address of the account you used to register your Kindle, click or tap sign out and log in with the correct account.
Also on this page, you will see when your loan period ends. After the loan expires, the title will automatically be returned.
Tap or click “Get Library Book” to send your e-book to your Kindle.
Once you have sent your e-book to your Kindle, you will get a confirmation screen that it was successful. The e-book will automatically be downloaded to your Kindle and it will be displayed in the Your Library section of your Kindle. If you are using a Kindle Fire, open up the Kindle app, which is called either Kindle or Books. If you don’t see the e-book on your Kindle, make sure that it is connected to WiFi.
Here is a step-by-step video showing the process when using the Libby app on an iPad:
Have you used the Libby app to send books to your Kindle? Let us know in the comments!