If you have used Google to search within the past year, you’ve likely noticed that the first thing that appears is an AI overview.
It takes up a lot of screen space, and its summaries are not always correct.
There are a few ways you can hide the AI summary. In this post, we’ll go over two methods you can try.
The first is to add -ai after your search term. If you were searching for “what is the first sign of spring” type in “what is the first sign of spring -ai” (without the quotation marks).
The second method is a little bit more complex, but you only have to do it once as an initial setup. This method is only available when using the Google Chrome browser on a desktop or laptop computer.
Open Chrome and click the three lines in the top right corner. Next, click on Settings. From there, click on Search Engine in the left menu. For the next step, click manage search engine and site search. Scroll down to Site Search and then click Add. In the Name and Shortcut fields, choose whichever custom name you’d like. In the URL field, type in: https://www.google.com/search?udm=14&q=%s and then click save. To make it your default search engine, click on the three dots next to the new entry and click on make default.
To search using this new search setting, click into the address bar. Next, type in your search term and then hit the enter key.
Currently, the ability to add a custom search URL is only available in the desktop version of the Chrome browser.
Do you have another method to hide the AI summary? Have you experienced incorrect AI summaries? Let us know in the comments!
Creativebug has thousands of award-winning arts and crafts classes taught by recognized design experts and artists. The classes cover a range of topics including quilting, paper crafts, baking, jewelry making, and more. You also have access to print patterns, coloring pages, and recipes for free. Note: this service is available only to residents of East Greenbush or Schodack. Not a resident of EG or Schodack? Anyone can use Creativebug at the library on one of our computers or on a device connected to our WiFi network.
Creating Your Account
Visit Creativebug and begin creating your free account with your library card.
After entering your library card number you will be directed to an account creation page. Fill out the required account information with your name and email address, and create a password for yourself. Creativebug will send you an email to confirm the account. Now you have access to hundreds of video classes and resources to begin your crafting adventures!
Getting Started
Once you have logged into Creativebug you can explore all the classes and resources it has to offer. Next to the Creativebug logo are different sections of Creativebug: Classes, Daily Practice, Learning Journeys, and Resources. Moving your cursor over Classes and Resources, you’ll see various drop down menus. Mousing over Classes shows the various types of crafting classes Creativebug offers. Mousing over Resources shows sections such as calendar, instructors, and more. On the home page you’ll see featured classes and recommended videos. Clicking on the Creativebug logo at the top of the screen will bring you back to the home screen from any section.
A quick menu is accessible by clicking the circle in the top right-hand corner with the first letter of your name in the center. Here you can find your recently watched, your watchlist, your gallery, and the community tab. You can also access your account and logout.
The notification icon is directly to the left of your profile and is represented by a bell. A small circle with a number in it will appear on the icon when you have a new notification. Clicking on the notification icon will open a sidebar on the right side of the screen showing more detail about each notification.
Clicking on Manage will take you to your profile where you can manage your notifications feed. The notifications feed displays updates about new classes, blog posts, and live events, as well as notifications when members leave comments or share gallery images on classes that you have watched or saved to your watchlist. Any of these notifications can be enabled or disabled to suit your preferences.
Classes
Creativebug offers 1,000+ classes on a variety of topics. You can click on Classes to display all of the classes available, or you can search for a class in the search bar at the top of the screen.
Mousing over the Classes tab displays a drop down menu that lists class topics.
Mousing over each class topic displays a drop down menu showing topics within that particular class subject.
After clicking on Classes or a class topic you will be on the page showing the video lessons. The videos have a thumbnail for the class, the name of the class, the class instructor, and rating. In the thumbnail for each class you will be able to see if the class is new or upcoming in the right-hand corner, and see the length of the video in the top left-hand corner.
Results can be filtered further to find the classes you are looking for. At the top of the results page is a drop down tab to filter results. Clicking it will display a menu where you can filter results by Category, Class Type, and Instructor.
At the top of the results page for the video classes you can sort the results by release date, popularity, and rating.
When you click on a particular video, you will see the video divided up into different sections, allowing you to easily go back or skip ahead to a particular part of the video. There is also an add to watchlist button to save for future viewing.
If you are interrupted while watching a video on Creativebug you can pick up where you left off by clicking on My Classes on the home screen. Next, click on the Recently Watched tab to see videos you have recently viewed.
Daily Practice
Creativebug also has a Daily Practice Tab that will take you to a page with longer videos that challenge crafters with 30 day prompts.
Learning Journeys
Learning Journeys are a curated experience designed to help you master new skills and guide you along in your creative practice. In each journey, you’ll follow a series of classes and techniques that build upon each other, allowing you to gain knowledge at your own pace.
Clicking on a particular Learning Journeys takes you to a page with the classes listed in order to begin your new crafting experience. At the top of the page is the curator of the Learning Journey and the total time of the classes in the list.
Resources
Creativebug provides many free resources for users. From the Resources tab, crafters can access a calendar of recent and upcoming classes, view instructor profiles, check the blog, explore Creativebug TV, access patterns & printables, and find class collections.
Calendar
The Calendar lets you look at the most recent classes as well as upcoming classes. You also have the opportunity to register for live virtual classes. You can use either a Zoom account or an email address to register for the classes.
Instructors
If you have an instructor that you have enjoyed you can find them on the Instructors page. Clicking on the Instructors tab will bring up the list of Creativebug instructors. Clicking on an instructor’s profile will bring up more information on that instructor and will have their video classes posted below.
Blog
There is also a Creativebug blog where you can catch up on all things crafting. The blog has content on crafts fairs and conventions, gives seasonal ideas, and provides more instruction for future crafts.
CBTV
CBTV lets you take a closer look into the lives, arts, and studios of your favorite artists and crafters on Creativebug. This page is also where you can look at previews of upcoming videos coming to CBTV.
Patterns & Printables
Creativebug lets you download and print knitting patterns, coloring pages, recipes, and more. Patterns & Printables can be filtered by topic and craft such as sewing or crochet.
When you click on a particular design, you will get more details on that pattern or item as well as the ability to download it as PDF. There is also a link to video instructions for certain printables and patterns.
Class Collections
Creativebug also offers class collections where classes are curated to cover one crafting topic to give you all the videos you will need to get started on a new craft. An example of a class collection offered is Adventure Begins at Your Library, which features 16 videos on that topic.
Inspiration
Share with the Creativebug community by clicking on the Inspiration tab on the homepage to share photos of your crafts and see other shared photos from fellow crafters on Creativebug.
There are three areas in the Inspiration tab. The first tab is My Gallery where you can upload photos of your crafts and projects. The second tab is Community Gallery where you can view photos that other crafters on Creativebug have shared. The third tab is Pinterest Boards where Creativebug shares link to curated Pinterest boards.
You can take Creativebug on the go. Visit the Google Play store or Apple App Store to download the app on your mobile device. Stay tuned for a post detailing the app.
Have you tried Creativebug yet? Let us know in the comments!
The library now offers access to a new language learning program called Mango. Mango can be accessed on a computer or through an app on a mobile device. Note: this service is available only to residents of East Greenbush or Schodack. Not a resident of EG or Schodack? Anyone can use Mango at the library!
When using Mango for the first time, there is a prompt to either login or sign up for an account. Click sign up to proceed.
If accessing Mango from outside of the library, you will also have to enter your library card number. Once you have created your account, choose a language to learn.
The most popular languages are first. To see a complete list of languages, scroll down. There are many languages to choose from, including both Latin American and Castilian Spanish, Italian, Korean, Russian, Urdu, Greek, Japanese, American Sign Language, and many more.
Navigating the App
Once you have made your language choice, you have the option to access the main learning section, which contains a placement test to gauge your familiarity the language. The learn tab contains the main units, which have five sections: introductions, connections, community, lifestyle, and ambitions.
To begin, tap on one of the lesson headings. The first time you access this section within the app, there is a tutorial about Mango and the different features it offers. Also in the learn section are specialty units specific to the chosen language.
Lessons and Chapters
Once you’ve gone through the tutorial, you’ll see the lessons within that chapter. Tap each number to get to that section of the lesson. To pick up where you left off, tap the blue triangle icon in the bottom right corner. When you open a chapter, the lessons are downloaded automatically and can be accessed with or without an internet connection. The number displayed next to the downloaded lessons label shows the amount of data the downloaded lessons take up on your device with the option to delete the data. Deleting the data does not remove your progress.
Lessons that have not been downloaded yet will have a black down arrow next to the lesson number. There are also sections with only listening lessons and only reading lessons.
In the Vocabulary tab, there are Mango curated vocabulary cards or create your own cards for particular words or phrases.
The Review tab contains a personalized review to catch up on your lessons.
To change which language you’re learning, tap on languages in the top left corner. The progress made with previously chosen languages is automatically saved. To access previously chosen languages swipe left or right.
To access more features, tap on the three lines in the top right corner. Here, there are options to edit your profile, change the language you are learning, an option to set up study reminders, and more.
Desktop Version and Mango Movies
The desktop version of Mango is only slightly different from the app. There are still Learn and Vocabulary tabs. The review tab is within the Learn and Vocabulary tabs. On the Explore tab, there is also a feature that is exclusive to the website called Mango Movies.
Mango Movies are videos that contain culture-packed content to help you learn a language. Once you click on play on a title, you can choose if you would like movie mode, which contains interactive content and no interruptions, or engage mode, which allows you to learn more about the dialogue with short lessons and interactive content throughout the movie.
On the subtitles screen, choose whether you want to see no subtitles, English subtitles, the subtitles of the language you’re learning, or both.
In the immersive mode, each scene starts with an introduction to the scene. Next you can view the scene, after that there is a follow up section, and then the option to view the scene again.
Another feature exclusive to the website is the translate section. You can access the translator by clicking on tools in the top navigation bar.
To change the learning language on the desktop website, click on the name of the language in the top left corner.
Family Profiles
In both the app and the desktop site, Mango offers a feature called Family Profiles. You can add up to five family profiles. This may come in handy if you have children or other members of your household that want to learn different languages (or even the same language at a different pace). In the app, Family Profiles is accessed by tapping on the three lines button in the top right corner and then tapping on Family Profiles. On the desktop site,
Little Pim
In both the Mango app and on the desktop website, there is a section of Mango for younger language learners. Little Pim is especially designed for children aged one to five years old. To access Little Pim on the app, scroll to the left on the bottom black navigation bar. On the desktop website, click on Explore, then click on Little Pim.
Little Pim features videos in the language you have previously chosen when you started using Mango.
Adios, Ciao, Au Revoir
Mango is a language learning program. Mango can be accessed either through a computer or a mobile device. With Mango, you can learn a variety of languages through interactive lessons, movies, flash cards, and more.
Mango is for all levels of learners, from beginner to advanced.
Have you tried Mango yet? Let us know in the comments!
If you have never tried to organize your apps, you may find yourself frustrated, flipping from screen to screen looking for the app you want. As a librarian, I am always looking for ways to better organize my environment to minimize frustration and maximize efficiency.
Both iOS and Android have options to organize your home screen, and many of them are similar. In fact, last week we published an article on this same subject for iOS. However, Android comes with so many opportunities for customization, the screenshots you see here may not reflect what is on your phone.
Fun Fact: Beyond the differences between Android version numbers (currently 13), Pixel phones and Samsung phones have differences added by their manufacturers. Your mobile carrier may also have made changes to your version of Android if you bought your phone from them. Android users also have the option to use “launcher” apps, which provide many more customization options for the look and operation of your device.
Your Home Screen vs. Your App Drawer
Icons for your apps live in two different places. Whenever you install an app, it is always installed in your app drawer. Depending on your settings, it may or may not also create an icon on your home screen automatically. The home screen is the default screen you see when you unlock your phone. The app drawer can be accessed either by swiping up from the bottom of your phone screen or by tapping the app drawer icon (if available):
The app drawer arranges apps alphabetically, with a search bar at the top. There isn’t much room for customization here without a third-party launcher app, so the rest of this article will focus on organizing the home screen.
The home screen is what you see when you tap the home button/icon or swipe up from the bottom of the screen, depending on whether you have gestures set up. The home screen can actually be several “pages.” Swiping to the left or right from the home page will show you how many pages your home screen is.
Create a New Home Screen Page
To create a new home screen page, press and hold a blank space (between icons/widgets) until the menu overlay pops up. Lift your finger and swipe to the left or right until you see the +. Click on it to add a page.
Adding and Removing Icons from the Home Screen
To add an icon to the home screen:
Open the app drawer
Press and hold on the app to add to home
When the home screen appears, slide your finger to the desired spot and lift your finger off the screen to drop the icon
If you receive a message that there is no more room on the home screen, try again, and drag the icon to the edge of the full page to create a new, blank page.
To see the same app icons at the bottom of every page, which is handy for apps you use often, you can drag icons to the “dock” (bottom row on the page).
To remove an icon from the home screen:
Press and hold an icon to reveal a menu
Lift your finger without sliding it on the screen to reveal a menu
Tap remove
Note: Deleting the icon from the home screen does not delete the app from your phone.
Quick Menus for Apps
Some app icons are designed to display a context menu when long-pressed (press and hold). These menus contain shortcuts to popular app options. Here is an example of the context menu that pops up when I long-press the Fitbit icon on my phone:
Tapping any of these brings me directly to the entry screen, rather than having to open the app and navigate to the logging screen.
Moving Icons Between Home Screen Pages
Press and hold an icon to select it
Drag it to the edge of the screen until it flips to the next page.
Slide your finger to the desired spot and lift your finger off the screen to drop the icon
If the screen does not have another page to put the icon on, you may need to follow the instructions above for adding a page.
Creating Folders to Group App Icons
To group icons, long-press an icon and drag it over the top of another icon and let go. The icon will now look like a split of both icons. Tap that to open the folder. Tap on “edit name” to add a name, if desired. Tap the three-button icon to sort or select additional apps.
To separate the icons again, open the folder and tap and hold one. Drag it out of the folder and lift your finger to let it drop on the home screen in a blank spot. You may need to slide between screens or create a new page to find an open spot.
Adding Widgets to Your Home Screen
Press and hold a blank space (between icons/widgets) until the menu overlay pops up.
Tap”widgets”
Scroll through the resulting page to see what widgets are available
To add one, press and hold until the home screen appears
Slide your finger to find the desired spot to drop the widget. Make sure there is enough room, as some widgets have minimum size requirements.
To resize a widget, press and hold it until a menu pops up. Select resize, then drag the dots on any side of the widget to make it larger or smaller.
Summary
Using folders and widgets to organize icons on your home screen can help you maximize productivity while minimizing frustration trying to find your apps. Do you use folders and widgets on your phone? Let us know in the comments.
Depending on how long you’ve had your smartphone, your home screen may be pretty crowded and unorganized. Luckily, there are easy ways you can organize your home screen.
A Home screen is the main screen or screens on a smartphone where you can tap app icons to access the apps you have installed on your phone. In this post, we will discuss the Apple home screen. Stay tuned for an Android home screen post.
Home Screen and Dock
By default, an iOS device (iPhone or iPad) automatically adds a newly installed app to your home screen.
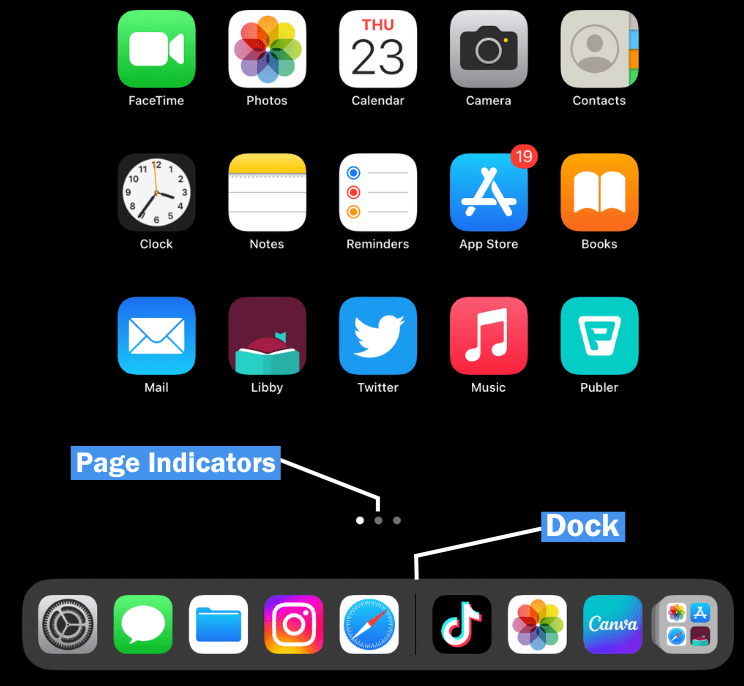
There is a dot for each home screen page you have. At the bottom of the screen some apps are displayed regardless of which page you are on. This area is called the dock.
Moving and Deleting Apps
To rearrange apps, hold your finger down on an empty area of the screen. The apps will start to wiggle and each app will have a minus symbol next to it. From here, drag the apps into the desired order. If there is an app you use frequently, you can drag it into the dock on the bottom of the screen.
Tapping on the minus symbol next to an app gives you several options. Delete app removes the app completely from your device. You will get a confirmation that verifies that you want to remove the app completely. The second option is to remove the app from the Home Screen. This removes the app icon shortcut, but the app is still on your device and can be accessed on the App Library screen.
Using Folders
You can group your apps into folders. For example, if you have more than one weather app, you may want to put them into a folder called Weather. To create a folder, long-press a blank area of the screen until the apps wiggle. Next, drag an app to another app you’d like to group it with. This automatically creates a folder. A default name is given, usually related to the type of apps you are grouping. To change the name, tap on the folder, and then the name of the folder. To remove a folder, drag all items out of the folder.
Long Pressing an App
Holding your finger down on an app icon gives you quick app shortcuts specific to that app. For example, long pressing the Notes app has several options. You can write a new note, a new checklist, scan a document, and more. There is also the option to choose edit home screen to rearrange your app icons.
The App Library
Starting with iOS 14, there is also the addition of the App Library, which lists all of your installed apps in organized groups. With the addition of the App Library, you no longer need to have all of your apps on the home screen. Each screen where you see app icons is called a page.
The App Library is accessed by swiping through all of your existing pages until you get to the last screen.
The App Library organizes all of your installed apps into categories such as social, utilities, and more. You can also search your app library to easily access any of your currently installed apps.
If there is an app that is in your App Library and it’s not on one of your home screen pages, tap into the search box. You will get a complete list of all your installed apps in alphabetical order or you can search for a particular app.
If an app is in your App Library but not on your home screen, locate the app in the app library. Once you have located the app, long press on the app icon and tap on add to home screen.
Home Screen Settings
There are several home screen settings you can change depending on your preferences. Go to the Settings App, then Home Screen (Home Screen & Multitasking on a iPad). You can choose whether newly downloaded apps should be added to the home screen or only the app library and whether you want to see notification badges in the App Library. On an iPad, you will also get the option to change app icon size and whether you want to show or hide the dock. Also in iPad settings, you have the option whether you want to see suggested and recent apps in the dock. The image below is a screenshot of the iPad settings.
Have you used any of these methods to organize your home screen? Let us know in the comments!