Stop Teams and Other Apps from Opening Automatically

You may have noticed after getting a new Windows computer or updating your operating system to the latest version that Microsoft Teams opens automatically every time someone on the computer logs in, even if none of the computer’s users use the software. If you’re not having this issue with Teams, you may be having it with another app you have installed. Personally, I find this really annoying. I prefer to open apps manually as needed.

Thankfully, this behavior is easily disabled. If you’d like to learn how to stop apps from loading when you log in, check out this article and video by Tech-Talk. Tech-Talk is a subscription resource brought to you by the library.

Need Basic Tech Help? Tech-Talk Has You Covered

Tech-Talk.com is an online resource available to patrons of the East Greenbush Community Library. This resource comes in several formats.

  • A website full of articles and videos to help you learn what you need to know to be successful with everyday technology
  • An app to help you get the above resources on-the-go
  • A weekly newsletter containing a quick technology tip
  • Access to live webinars that end up as videos on the website
  • The opportunity to request an article or webinar on a topic of your choosing

The Website

There is so much information on the website that finding what you need can be a bit overwhelming if you’re not sure what you’re looking for. Luckily, Tech-Talk has grouped the information in several different ways to help make it easier to browse.

The page we’re highlighting today is Basics for Non-Techies. If you are a novice user looking for basic information about working with email, documents, and the internet, this is the page for you. Even if you aren’t a novice user, you may find something on this page that would be useful to you.

Join us next time, when we highlight other pages that help you browse and find quick solutions.

Do You Use Tech-Talk?

If you have tried Tech-Talk, let us know what you think! Did they have the answers you were looking for?

Resize Images Easily

If you post images on the internet with some regularity, you may have noticed that every platform has different recommended sizes for images. It can be a pain to make a graphic over several times to post in multiple places. In a previous post, I wrote about Biteable, a tool that will automatically convert any image to all of the recommended sizes for social media platforms. This is great for my social media needs, but not for another resizing issue that comes up regularly for me.

Our website has a row of featured events/services/announcements that need to be sized at 300px x 300px in order to line up or stack neatly on any size screen. I have been given graphics and logos in all dimensions that I have needed to make fit into these blocks. Canva has a magic resize tool, but that hasn’t generated results that work for me.

Enter Pixlr

Pixlr comes in two “flavors.” Pixlr X and Pixlr E. Both are free, browser-based tools that don’t require an account. They are similar to Canva, but not as full-featured. Pixlr X is meant for creating basic designs, while Pixlr E is for editing photos. The free version of Pixlr X is what we are using today, but both products have robust premium versions if you are interested in AI assistance, a larger decorative element library, more support, or no ads.

How I Use It

I am fortunate enough to have several design editing tools at my disposal, and I use different tools for different tasks. Pixlr X fills a very specific need for me, and it never fails.

As I mentioned, the library website needs images that are 300px x 300px. Product logos/graphics, ready-made templates in image editors, and graphics for initiatives from outside our organization (Summer Reading, Tech-Talk, etc.) rarely come in that size, or even in a square shape. For instance, here is the logo for Consumer Reports, a digital resource we provide to our patrons:

Consumer Reports logo

The original is 1600px x 900px, so it needed some editing. I opened Pixlr X, then clicked “open image” in the center of the page.

Screenshot of Pixlr X home page showing the open image button.

This opened a window that allowed me to select the original Consumer Reports image that is 1600px x 900px. The first thing I wanted to do is scale this down to a 300px width, so I clicked on the layout button in the left menu.

Screenshot showing the third menu item from the top of the left menu selected, with layout options opened to the right of it.

I selected “resize page (scale)” and reset the width to 300. By leaving the “constrain proportions” toggle activated, the height automatically adjusted to prevent the logo from being distoryed.

Screenshot showing the width set to 300, the height set to 168, and the constrain proportions toggle activated.

The next step is to add a 300px x 300px background and center the image. Staying in the layout menu, I selected “set page size.” Here I changed the height to 300, made sure the “relative change” toggle was deactivated and anchored the logo in the center of the image.

This is how it turned out. The checkerboard part indicates transparent space. The next step is to add a background. I could just add white, but then the image would be really boring.

Screenshot of Consumer Reports logo with checkerboard pattern bars above and below it.

Instead, I want to copy the green from the logo and make that the background. I did this using a separate eyedropper tool to get the hex code number for the color (covered in this article) and then going back to my layout menu in Pixlr to activate the background toggle. This suggests a few colors, but you can click any color to reveal a box to enter a custom color.

Screenshot of the layout tab showing background color suggestions.

I entered the hex code for your desired color in the box and hit “enter” to apply.

Screenshot showing hex code entry box below the suggested background colors.

This is the finished product. It’s a simple fix that preserves the company’s logo guidelines while making the image suitable for our website.

Resized logo with the transparent bars above and below in green matching the green in the logo.

Pixlr offers different formats and quality options for downloading your new image.

Summary

Pixlr is a free tool that makes design and image editing easy. While many of its features are duplicated in other free or low-cost image editing tools, the ability to change the size of the image canvas without messing up the aspect ratio of the original image in addition to changing the image itself has permanently secured its place in my image editing toolbox. What are your favorite design editing tools? Let us know in the comments.

Access Even More Digital Content with Your Library Card

If you enjoy downloading or streaming digital content with your library card, we have great news for you. The available selection on OverDrive/Libby just got bigger! The Upper Hudson Library System (UHLS) and the Mid-Hudson Library System (MHLS) have decided to partner up and share resources. Members of both library systems have access to both digital catalogs with a single library card number.

UHLS members can continue to use OverDrive/Libby as they always have, but now they have an additional option to search the MHLS collection and borrow from there, as well. Don’t worry – this won’t make wait times longer for popular items in either digital library. Only items available for immediate checkout are available to the members of the guest library system.

How to Access Additional Content

Using the Libby App

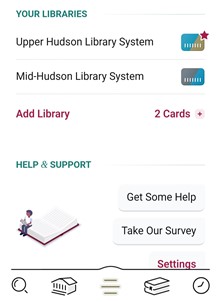
Screenshot of Libby main menu

Go to the Libby menu and select “Add library.”

Screenshot of search results with Mid-Hudson Library System available

Search for and select “Mid-Hudson Library System.”

Screenshot of MHLS selection screen

Select “Upper Hudson Library System Cardholder” under Partner Libraries and sign in with your card number.

Screenshot showing library selection screen

Once you have activated both systems, you can toggle between the two from the menu.

Using the OverDrive Website

Sign in to the OverDrive website by selecting “Upper Hudson Library System” dropdown menu.

Screenshot of https://uhls.overdrive.com sign in screen

Toggle between the partner libraries by selecting the desired system from the Partner Libraries dropdown menu.

Frequently Asked Questions

Will UHLS users see everything from the MHLS catalog?

No. Titles that are not available for checkout will not be visible.

Can guest users place holds?

No, users can only place holds in their own library system’s digital catalog.

Can guest users renew their loans?

Yes, as long as there are no other users are waiting for the item.

How many items can be borrowed at a time?

Both UHLS and MHLS each allow users to borrow up to 10 items at once. The limits set by each system will function independently. Items borrowed from UHLS will not count against the MHLS 10 item limit. Likewise, items borrowed from MHLS will not count against the 10 item limit set by UHLS.

Can guests recommend titles for purchase?

No. Users can only make recommendations of titles to purchase to their own library system.

Will settings applied to a UHLS account carry over to the MHLS collection?

Any settings you configure in the Libby app (accessibility options, notifications, etc.) will be applied to all library systems linked to your account.

Settings that you apply on the website version (default lending period, display options, etc.) will only apply for the specific collection associated with them. If you want the same settings on both collections, you will have to configure them separately for each site.

Will students accessing the UHLS collection through Sora’s Public Library Connect feature have access to the MHLS collection?

No, Public Library Connect users will only have access to their home library system’s collection at this time. They will not see options to access additional content from other systems.

Conclusion

Thanks to the partnership between our library systems, more digital content is available for all library users. Everybody wins! Let us know how you like this new feature in the comments. Got questions? We’re happy to help.

Free Tools to Precisely Match Any Color on Your Computer Screen

Sometimes when creating visual content it’s important to match colors exactly, but how do you do that if you didn’t create the original image? The answer is to get a color code – either hex or RGB – that makes the color unique. That code can be used to match the color in other locations. Even if you are familiar with these terms, it can be difficult to guess these codes, even if you have a key to compare to. If you have a Mac, there is a built-in tool to help. And sure, expensive image manipulation tools include an “eyedropper” feature that can identify the color, but what about the rest of us on a PC using free or low-cost tools, or those who want to match colors outside of image editing software? Luckily, there are free color matching tools that can help. Today I will highlight a browser extension for matching colors when the internet is involved, as well as a downloadable tool that can match any color you see on your screen.

ColorPick

ColorPick icon
ColorPick icon

ColorPick is a browser extension that is available for Chrome, Firefox, and Edge browsers. After it is installed, it will appear as an icon in your toolbar. To capture the code for a color displayed in your browser, click the ColorPick icon and then hover over the color to reveal the hex and RGB codes.

If you are interested in step-by-step directions, Tech-Talk has written a great article with a video and screenshots outlining all of the steps using the Chrome browser. Operation of the tool works the same no matter which browser you are using.

Instant Eyedropper

Instant Eyedropper icon

There are some situations in which a browser tool will be unable to capture the color you want to copy. For instance, if you have an existing image saved on your computer that you want to pull a color from, the browser tool won’t help. This comes up often for me as a web editor. Library staff will give me an image associated with an event or service, and I need to make it a clickable image for the website. Without added text, it can be unclear whether the image is clickable. But I want to make sure any text I add blends seamlessly with the existing image. This is the perfect use case for Instant Eyedropper. It should be noted, however, that this tool will only supply hex codes.

Instant Eyedropper is available in both portable and installed varieties. To start the program, open it from your portable drive or the start menu. After you do, the Instant Eyedropper icon will appear in your taskbar:

Screenshot showing the Instant Eyedropper icon in the taskbar
Eyedropper icon in the taskbar

If you don’t see the icon, try clicking the arrow to reveal hidden icons. You can drag the icon down to the taskbar to make sure it stays visible.

Click the icon in the taskbar to activate the eyedropper, and your mouse cursor will become crosshairs. Hover over a pixel with the desired color to reveal the hex code. The display magnifies the coverage area to allow for the most accurate selection:

Screenshot showing eyedropper display of hex codes
Hex code display

Notice that the area appears to be white, but white would show hex code FFFFFF. This tool is sensitive enough to pick up even the subtlest shade differences. Click to copy the code when it is perfectly placed. After you click to copy the code, your cursor will return to its normal shape and deactivate the eyedropper. Use any pasting method to transfer the code to its destination.

Please note that some apps will not support the copy/paste action. In that case, simply copy the displayed hex code and enter it manually in its destination.

Conclusion

There are a number of free eyedropper tools, and we have only highlighted two of the most popular. If you have a favorite tool or a question about the tools discussed here, let us know in the comments.