Free Tools to Precisely Match Any Color on Your Computer Screen

Sometimes when creating visual content it’s important to match colors exactly, but how do you do that if you didn’t create the original image? The answer is to get a color code – either hex or RGB – that makes the color unique. That code can be used to match the color in other locations. Even if you are familiar with these terms, it can be difficult to guess these codes, even if you have a key to compare to. If you have a Mac, there is a built-in tool to help. And sure, expensive image manipulation tools include an “eyedropper” feature that can identify the color, but what about the rest of us on a PC using free or low-cost tools, or those who want to match colors outside of image editing software? Luckily, there are free color matching tools that can help. Today I will highlight a browser extension for matching colors when the internet is involved, as well as a downloadable tool that can match any color you see on your screen.

ColorPick

ColorPick icon
ColorPick icon

ColorPick is a browser extension that is available for Chrome, Firefox, and Edge browsers. After it is installed, it will appear as an icon in your toolbar. To capture the code for a color displayed in your browser, click the ColorPick icon and then hover over the color to reveal the hex and RGB codes.

If you are interested in step-by-step directions, Tech-Talk has written a great article with a video and screenshots outlining all of the steps using the Chrome browser. Operation of the tool works the same no matter which browser you are using.

Instant Eyedropper

Instant Eyedropper icon

There are some situations in which a browser tool will be unable to capture the color you want to copy. For instance, if you have an existing image saved on your computer that you want to pull a color from, the browser tool won’t help. This comes up often for me as a web editor. Library staff will give me an image associated with an event or service, and I need to make it a clickable image for the website. Without added text, it can be unclear whether the image is clickable. But I want to make sure any text I add blends seamlessly with the existing image. This is the perfect use case for Instant Eyedropper. It should be noted, however, that this tool will only supply hex codes.

Instant Eyedropper is available in both portable and installed varieties. To start the program, open it from your portable drive or the start menu. After you do, the Instant Eyedropper icon will appear in your taskbar:

Screenshot showing the Instant Eyedropper icon in the taskbar
Eyedropper icon in the taskbar

If you don’t see the icon, try clicking the arrow to reveal hidden icons. You can drag the icon down to the taskbar to make sure it stays visible.

Click the icon in the taskbar to activate the eyedropper, and your mouse cursor will become crosshairs. Hover over a pixel with the desired color to reveal the hex code. The display magnifies the coverage area to allow for the most accurate selection:

Screenshot showing eyedropper display of hex codes
Hex code display

Notice that the area appears to be white, but white would show hex code FFFFFF. This tool is sensitive enough to pick up even the subtlest shade differences. Click to copy the code when it is perfectly placed. After you click to copy the code, your cursor will return to its normal shape and deactivate the eyedropper. Use any pasting method to transfer the code to its destination.

Please note that some apps will not support the copy/paste action. In that case, simply copy the displayed hex code and enter it manually in its destination.

Conclusion

There are a number of free eyedropper tools, and we have only highlighted two of the most popular. If you have a favorite tool or a question about the tools discussed here, let us know in the comments.

Helpful Trick: What Happens When You Tap Your iPhone’s Back?

Did you know that the back Apple logo on your iPhone is not just for decoration? By accessing certain settings, you can have your iPhone perform certain functions with just a double or triple tap. Please note that this applies only to iPhones and not iPads.

To get started, go into the Settings app and then tap on Accessibility.

screenshot settings options

Next, scroll down to Touch, which is under the Physical and Motor heading.

screenshot accessibility options

Once you’re on the Touch screen, scroll to the bottom and tap on Back Tap.

screenshot touch options

Next, you’ll have the option on what action is taken when you double or triple tap. Double tap or triple tap means tapping the phone twice or three times in quick succession. Tap on either double tap or triple tap.

screenshot back tap options

Once you’ve selected double or triple tap, you’ll get a list of possible actions.

screenshot double tap options

You’ll get a decent sized list of system actions, including activating Siri, volume down, going to the home screen, and more. If you scroll down, there are also more accessibility features, scroll gestures, and custom Shortcuts you can make with the built-in Shortcuts app.

Have you tried out this feature? Let us know in the comments.

Meet the Best Free Browser Tool for Removing Backgrounds

Have you ever wished you could take that great photo of yourself and change the surroundings? Removing people or unsightly background items from your favorite pictures could be very useful, for example. Many folks think you need an expensive tool like Photoshop to make this happen. The good news is, there are several free/low-cost tools that can be used for this purpose. You may even already have access to some of them without knowing it! Today we are going to focus on a tool that can be used in any modern browser without creating an account or downloading software: remove.bg.

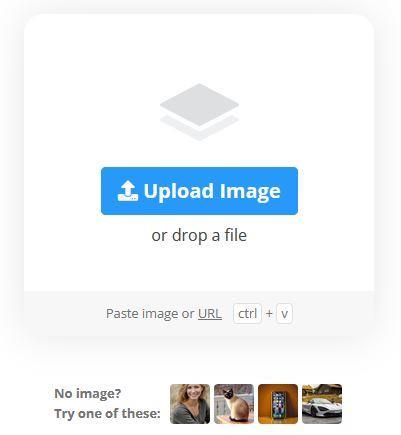
The interface couldn’t be simpler. To upload your image, you can drag and drop an image, search your computer files for an image, or copy/paste an image or image URL.

When your image is uploaded, the program gets to work removing what it thinks is the background. This car image was spot on.

When I used a more complicated image, the remove.bg took off the falling snow that I wanted to keep above the cat’s head.

Notice the edit button in the top right of the image with the background removed. Clicking that leads to options for setting a new background or editing how much background is removed.

Add another background or download the image without one

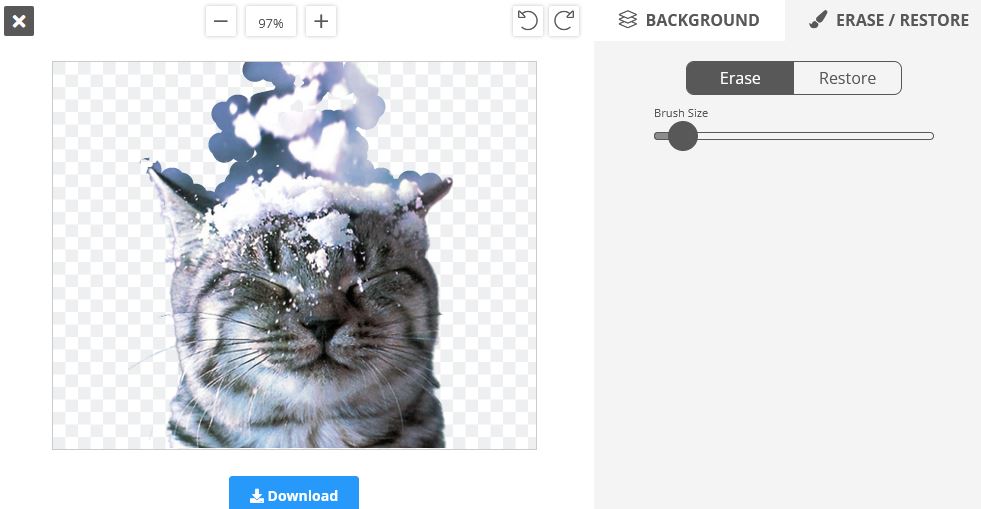
Click the erase/restore tab in the upper-right to get a resizable “brush” to remove more background or restore something that the tool took out. In this case, I restored some snow with a wide brush here. I can go back and erase with a smaller brush to cut a finer line around the snow.

Fine-tuning what to keep from the original

I went back to the background tab and chose a dramatically different color for the new background, but I could have downloaded the image without adding another background if I wanted to use it in another image editor. Or I can download this version with the new background:

Cutting around the snow was tough!

The Fine Print

Anytime a tool is free, we should be skeptical about what we are agreeing to in exchange for the service. If you are concerned about your privacy, you can check out their privacy policy, but I didn’t see anything there that I was concerned about. In this case, remove.bg is free for low resolution (up to .25 megapixels or around 625px x 400px) images. If you want your downloads to be at a higher resolution, you will need credits. One (credit) per month is allowed on the free plan. Credits can be used in the downloadable version of remove.bg.

If you need to work with larger images more often you can go with a paid plan. Plans are available as subscriptions (credits per month) or pay as you go (credits to be used within two years of purchase). More about credits on their website.

Conclusion

Remove.bg is a great free browser tool for removing image backgrounds. Have you used remove.bg? If so, let us know in the comments. Stay tuned to this blog for more tools to remove image backgrounds and other Tech Tips.

Virtually See the Libby App in Action

In April 2023, the library held a virtual program via Zoom called Libby 101. The program was a basic intro to the Libby app, which is the app created by OverDrive to read and listen to e-books, audiobooks, and magazines. If you were unable to attend the virtual program, you’re in luck! The presentation was recorded and uploaded to our YouTube channel.

To watch the entire presentation, please view the playlist on our YouTube channel.

Part One: Getting Started With Libby: Getting started with the app and the steps to take after downloading the app and opening it for the first time.

Part Two: Browsing and Searching: Browsing and searching for content on the Libby app.

Part Three: Borrowing and Placing a Hold: Borrowing an item and how to place a hold on an item.

Part Four: The Shelf: Loans: The loans section of the Shelf section of the Libby app.

Part Five: The Shelf: Holds: The Holds section of the Shelf on the Libby app.

Part Six: Reading and Listening Settings: Adjusting the settings used while reading and listening to digital content.

Part Seven: Settings: The settings section of the Libby app.

If you have any questions about the Libby app, please call the library or ask a librarian when you’re in the library.

Do you use the Libby app? Let us know in the comments.

Check out these great new email newsletters from NextReads!

What is NextReads?

NextReads is a service provided by the East Greenbush Community Library to its members. Through NextReads, you can sign up for email newsletters that contain reading suggestions based on your interests. Frequency differs based on topic. Use these newsletters to help you find your next great read!

Newsletters are offered in various fiction genres, nonfiction subjects, and other specialty categories. To learn more about the newsletters we offer, head to the sign-up page and select the information icon next to a title to read a description of the newsletter (including frequency), or click a newsletter title to read the latest issue:

Screen shot of the NextReads Fiction section

Residency is not required to sign up for newsletters, and the email you use to sign up will not be used for any other purpose. Simply check the box next to any newsletters you are interested in and scroll to the bottom to enter your information, prove you’re not a robot, and subscribe. If a newsletter doesn’t turn out to be your cup of tea, you can always unsubscribe by scrolling to the bottom of an issue that has been emailed to you and clicking the unsubscribe link.

The new newsletters

This February, two new newsletters became available for subscription:

  • Page to Screen: Is the book better? Decide for yourself with this list of books that inspired recent or upcoming movies and TV shows. Bi-monthly.
  • Must-Read Books: A monthly list featuring the top ten books loved by librarians across the U.S.

How can I get these newsletters?

To sign up for either of these lists, or to check out other member favorites like Biography and Memoir or Fiction A-Z, head to the NextReads sign-up page and subscribe to as many as you’d like for free! Are you already a subscriber? Let us know your favorite newsletters in the comments. Looking for more personalized recommendations? Fill out this form to have a librarian select items for you based on features of books you’ve already enjoyed. Don’t want to wait for a newsletter? East Greenbush and Schodack residents have access to NoveList, an online recommendation engine for books and audiobooks. Happy reading!