You’re listening to the radio or watching TV and a song comes on that you don’t know. You like the song, but how can you find out what it is? Luckily, there are built in features on your smartphone that allow you to name a song in seconds!
Apple
Starting with the release of iOS 14.2 in 2020, Apple devices offer built in song recognition, just by asking Siri, the built-in digital assistant. In your Siri settings, if you have “Hey Siri” enabled, simply say, “Hey Siri, what song is this?” when a song is playing. Another way to quickly activate Siri is to hold down the Home Screen button iPhones with a home button or hold down the power button on iPhone 9 and later.
You’ll get a screen that Siri is listening and then a screen will pop up with the name of the song.
To see a history of songs you have identified, download the Shazam app from the App Store. To see more detailed instructions, check out this helpful article from Apple.
Android
On Android phones, there is a similar method. Touch and hold the home button or say “Hey Google” and then ask, “What’s this song?”
Google Assistant will name the song and give you options to share the song, watch the video on YouTube, or add to a playlist on YouTube Music. Google has written a helpful article with more detailed instructions.
Use the Google App
You can also identify songs with both iOS devices and Android devices by using the Google app. The neat thing with the Google app is that in addition to identifying a song by playing it, you can also sing or hum it yourself. This is handy in case you have a certain lyric or melody stuck in your head.
Open the Google app and tap on identify song by listening. Another option is to tap on the microphone icon and then tap search for a song.
When I attempted to sing a song, I got a 48% match of the song I was singing.
Then again, my singing voice isn’t the greatest, so you may get better results. I only got a 34% match when I attempted to hum a song.
Have you tried identifying a song with your smartphone? Let us know in the comments!
It’s a moment of panic we’ve all had at some point. You reach for your phone or device and it’s not there. You try to call yourself from another phone but you don’t hear your phone ring. Fear not! There is a way you can locate your device, even if it’s in a different location.
Apple has an app called Find My. By default, it comes pre-installed on all devices (iPhone, iPad, Mac, and Apple Watch).
Setting Up Find My on an iPhone or iPad
There are various ways you can access Find My. The first step is to make sure that it’s enabled on your device.
On an iPhone or iPad, go into the Settings app, and then tap on your name at the top.
From there, tap on Find My on the next screen.
Next, you can verify if Find My is on for that particular device. You can also choose to turn it off if you’d like. If you have more than one Apple device, it will show which device is sharing your location with friends and family you have chosen to share your location with. If you are sharing your location with anyone, they will be listed below underneath family (if you have set up Apple Family Sharing) or friends.
Tapping on Find My iPhone/iPad gives you more options, including the option to turn off Find My (note you will need to enter your Apple ID password if you want to turn it off). Find My Network lets you locate your device even if it’s offline. Send last location sends the location of the device to Apple if the battery is very low.
Setting Up Find My on a Mac
To set up Find My on your Mac, click on the Apple icon in the top left corner of the taskbar and then click on System Preferences. Next, click on Internet Accounts. On the left panel, click on iCloud and then scroll down to Find My. Click on the Options button next to Find My. The options below apply to Mac OS Monterey and later.
Here you can see if Find My Mac is on and you can also choose the option to locate your Mac even if it’s offline. You have the option to turn both of these off. Keep in mind that to turn off Find My Mac, you will need to enter your Apple ID password.
Setting Up Find My on Apple Watch and Other Devices
By default, Find My is automatically set up on an Apple Watch when you pair it with your iPhone for the first time. For more information on using Find My with your Apple Watch, Apple has written up a great how-to article.
Additionally, Find My is automatically turned on when you pair your AirPods with your iPhone or iPad for the first time.
Using Find My
Now that it’s been set up, you can easily locate your missing devices in several ways. On an iPhone, iPad, or Mac, you can open the Find My App, which has an icon that looks like this:
On a Mac, the Find My app is located in the Launch Pad by default.
When you open the app, you will see a map, along with a dock on the bottom. On the bottom dock, tapping the people icon shows friends and family who have shared their location with you and their locations. The devices tab shows mini icons of your devices and their locations on a map. Your family’s devices are also displayed if you have set up Apple Family Sharing. The items tab is for Find My compatible items such as AirTags. The Me button (on an iPhone and iPad) shows your location and from which device the location comes, as well as the option to turn off sharing your location. On a Mac, these tabs are located on the top left.
Finding a Device on an iPhone, iPad, or Mac
To find a device, tap on the devices tab and then tap on the name of the device you want to locate. It will zoom into the device’s location on a map and give you the address of your device. You’ll have the option to play a sound, which may help if you are near your device’s location.
Finding a Device with a Web Browser
If you only have one Apple device, don’t worry, there is another way you can locate your lost device. Go onto a web browser on a laptop, desktop computer, or another mobile device, and navigate to iCloud.com. Next, click or tap on sign in. Log in with your Apple ID and password. Don’t worry if you have two-factor authentication enabled, simply click or tap the Find Devices on the lower left.
Enter your password again, and then a map will appear. Click on all devices in the top center, and select a device to locate. A map will zoom into the location of your device. There are options to play a sound, put the device into lost mode, or remotely erase the device in the case of an iPhone, iPad, Mac, or Apple Watch.
Putting a Device into Lost Mode
If you cannot find your device, or if it has been stolen, there is also the option to mark the device as lost or remotely erase it. Marking the device as lost causes the following to happen: you will receive a notification on your other devices when its location is available, the activation lock will be enabled so no one can reset your device and link it to their account, a passcode will be required if they try to turn it on, any payments (such as Apple Wallet or Apple Pay) will be suspended, and you will have the option to leave a message on your device displaying a phone number where you can be contacted.
A device can be put into lost mode from any of the Find My apps or on iCloud.com.
Finding a Device with Apple Watch or with Siri
To find a device with your Apple Watch, check out this helpful article from Apple. If you are in the same location as your device but aren’t sure where it is, you can ask Siri to find it if you have a second Apple device. Simply say, “Hey Siri, where’s my [device name]?” If it’s nearby, she will respond, “your [device name] is nearby, pinging it now” and she will play a sound on the device you’re looking for, including AirPods. If your device is not within range, she will say she can’t find it and suggest that you use the Find My app.
Have you used Find My to locate a device? Let us know in the comments!
Depending on how long you’ve had your smartphone, your home screen may be pretty crowded and unorganized. Luckily, there are easy ways you can organize your home screen.
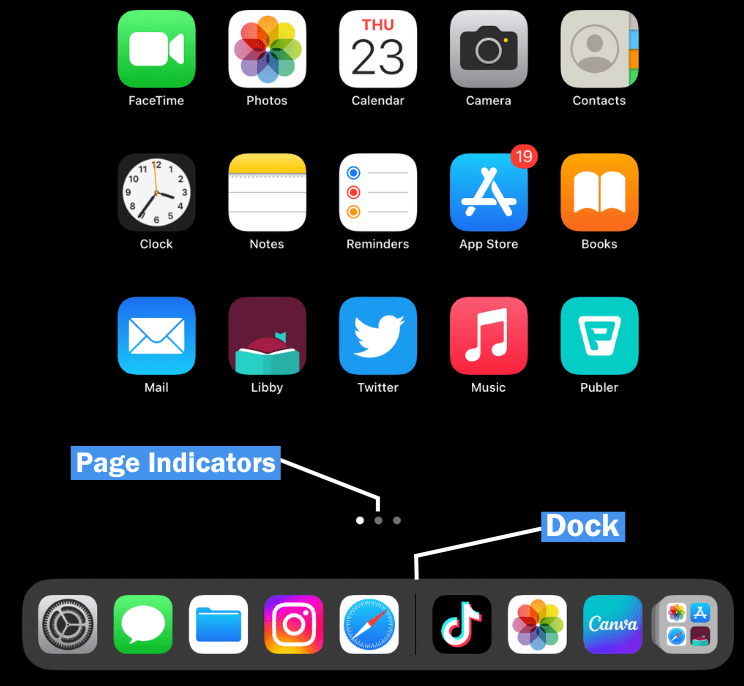
A Home screen is the main screen or screens on a smartphone where you can tap app icons to access the apps you have installed on your phone. In this post, we will discuss the Apple home screen. Stay tuned for an Android home screen post.
Home Screen and Dock
By default, an iOS device (iPhone or iPad) automatically adds a newly installed app to your home screen.
There is a dot for each home screen page you have. At the bottom of the screen some apps are displayed regardless of which page you are on. This area is called the dock.
Moving and Deleting Apps
To rearrange apps, hold your finger down on an empty area of the screen. The apps will start to wiggle and each app will have a minus symbol next to it. From here, drag the apps into the desired order. If there is an app you use frequently, you can drag it into the dock on the bottom of the screen.
Tapping on the minus symbol next to an app gives you several options. Delete app removes the app completely from your device. You will get a confirmation that verifies that you want to remove the app completely. The second option is to remove the app from the Home Screen. This removes the app icon shortcut, but the app is still on your device and can be accessed on the App Library screen.
Using Folders
You can group your apps into folders. For example, if you have more than one weather app, you may want to put them into a folder called Weather. To create a folder, long-press a blank area of the screen until the apps wiggle. Next, drag an app to another app you’d like to group it with. This automatically creates a folder. A default name is given, usually related to the type of apps you are grouping. To change the name, tap on the folder, and then the name of the folder. To remove a folder, drag all items out of the folder.
Long Pressing an App
Holding your finger down on an app icon gives you quick app shortcuts specific to that app. For example, long pressing the Notes app has several options. You can write a new note, a new checklist, scan a document, and more. There is also the option to choose edit home screen to rearrange your app icons.
The App Library
Starting with iOS 14, there is also the addition of the App Library, which lists all of your installed apps in organized groups. With the addition of the App Library, you no longer need to have all of your apps on the home screen. Each screen where you see app icons is called a page.
The App Library is accessed by swiping through all of your existing pages until you get to the last screen.
The App Library organizes all of your installed apps into categories such as social, utilities, and more. You can also search your app library to easily access any of your currently installed apps.
If there is an app that is in your App Library and it’s not on one of your home screen pages, tap into the search box. You will get a complete list of all your installed apps in alphabetical order or you can search for a particular app.
If an app is in your App Library but not on your home screen, locate the app in the app library. Once you have located the app, long press on the app icon and tap on add to home screen.
Home Screen Settings
There are several home screen settings you can change depending on your preferences. Go to the Settings App, then Home Screen (Home Screen & Multitasking on a iPad). You can choose whether newly downloaded apps should be added to the home screen or only the app library and whether you want to see notification badges in the App Library. On an iPad, you will also get the option to change app icon size and whether you want to show or hide the dock. Also in iPad settings, you have the option whether you want to see suggested and recent apps in the dock. The image below is a screenshot of the iPad settings.
Have you used any of these methods to organize your home screen? Let us know in the comments!
Have you ever been in the room with someone and wanted to share something: a photo, a web link, something from an app, but didn’t want to text or email it? For Apple users, there is an easier way!
All Apple devices come with a built in feature called AirDrop. AirDrop can be found on Macs, iPhones, and iPads. AirDrop allows you to wirelessly share documents, photos, map locations, webpages, and more.
Setting Up on an iPhone and iPad
To get started, make sure that AirDrop is enabled on your device. On an iPhone or iPad, go to Settings–General–AirDrop. From there you have the option to turn receiving off, to allow only contacts to AirDrop something to you, or everyone in range for 10 minutes. Note: if you are using iOS 15 or earlier, your options will be receiving off, contacts only, or everyone. AirDrop is available on iOS 7 and later and Mac OS X 10.7 Lion and later.
Setting Up on a Mac
Mac users, click on the control center icon in the taskbar.
From there, click the AirDrop icon to turn AirDrop on or off or control who can send you items. To turn AirDrop off completely, click the selector in the heading. If it is turned off, you will not see the Contacts Only or Everyone options.
Once you have turned on AirDrop, you can send and receive items from other Apple users in the area who have enabled AirDrop.
Sending an Item with AirDrop
To send something using AirDrop, tap on the share icon. This is found anywhere something can be shared. In the Safari app, it is in the toolbar. You can share from most apps, including TikTok, Zillow, Instagram, and other places where you see the share icon. Alternatively, some apps have their own Share option. You can tap AirDrop after tapping on the share option in any app that has a share feature.
Once you tap on the share icon, you will see your sharing options. This is also an easy way to share an item via text, email, or the other options listed. Tap on the AirDrop icon. If you don’t see the AirDrop icon you may have to tap on more or the three-dot icon, depending on the app.
Choosing Who to Send an Item To
After you tap on the AirDrop icon, there will be a list of people you can send items to. If there is no one available, you’ll get a message saying no people were found. Sometimes it takes several seconds for contacts or people to appear. When there is someone nearby and they are not appearing as an option, confirm they have AirDrop enabled, and if you are not a contact, that they have “everyone” selected as an option.
Tap on their name. If the person has a picture set in their contact info, or if you have a picture set for them on your device, you will see their picture. Otherwise, it will be the grey generic person icon. You can also share with more than one person at the same time by tapping their name on the same screen. Just a reminder, AirDrop is only available for Apple users.
On the other person’s end, they will get an option to either accept or decline the AirDrop.
If they accept, you will see a waiting status, then a circle with the progress, and then a sent status. If they decline, you will see “declined” in red under their name. When you are AirDropping something to yourself between two different devices (for instance if you share a photo from your iPhone to your Mac), you won’t have to click accept. It will automatically be shared. A website will open in Safari, a picture will open in the Photos app, and shared items from other apps will open in their respective apps. If an item is being shared from your iPhone or iPad to your Mac, by default, it will go into your Downloads folders.
Have you tried AirDrop? Let us know in the comments!