How To Make Your Home Screen More Manageable and Efficient in Minutes: Apple Edition

Depending on how long you’ve had your smartphone, your home screen may be pretty crowded and unorganized. Luckily, there are easy ways you can organize your home screen.

screenshot of an iphone showing the home screen.

A Home screen is the main screen or screens on a smartphone where you can tap app icons to access the apps you have installed on your phone. In this post, we will discuss the Apple home screen. Stay tuned for an Android home screen post.

Home Screen and Dock

By default, an iOS device (iPhone or iPad) automatically adds a newly installed app to your home screen.

Screenshot showing location of page indicators and dock on an iPhone.

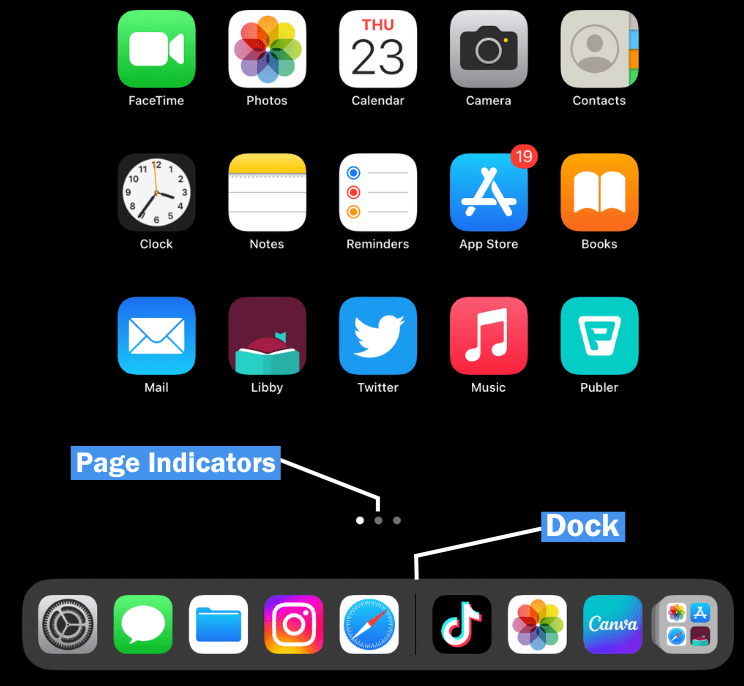
There is a dot for each home screen page you have. At the bottom of the screen some apps are displayed regardless of which page you are on. This area is called the dock.

Moving and Deleting Apps

To rearrange apps, hold your finger down on an empty area of the screen. The apps will start to wiggle and each app will have a minus symbol next to it. From here, drag the apps into the desired order. If there is an app you use frequently, you can drag it into the dock on the bottom of the screen.

screenshot showing the screen with minus symbols next to each icon

Tapping on the minus symbol next to an app gives you several options. Delete app removes the app completely from your device. You will get a confirmation that verifies that you want to remove the app completely. The second option is to remove the app from the Home Screen. This removes the app icon shortcut, but the app is still on your device and can be accessed on the App Library screen.

screenshot show the message that appears when remove app is tapped. The options include delete app, remove from home screen, and cancel.

Using Folders

You can group your apps into folders. For example, if you have more than one weather app, you may want to put them into a folder called Weather. To create a folder, long-press a blank area of the screen until the apps wiggle. Next, drag an app to another app you’d like to group it with. This automatically creates a folder. A default name is given, usually related to the type of apps you are grouping. To change the name, tap on the folder, and then the name of the folder. To remove a folder, drag all items out of the folder.

GIF showing how to drag an app onto another app in order to create a folder.

Long Pressing an App

Holding your finger down on an app icon gives you quick app shortcuts specific to that app. For example, long pressing the Notes app has several options. You can write a new note, a new checklist, scan a document, and more. There is also the option to choose edit home screen to rearrange your app icons.

screenshot showing what happens when you long press on an app.

The App Library

Starting with iOS 14, there is also the addition of the App Library, which lists all of your installed apps in organized groups. With the addition of the App Library, you no longer need to have all of your apps on the home screen. Each screen where you see app icons is called a page.

The App Library is accessed by swiping through all of your existing pages until you get to the last screen.

GIF showing how to swipe through all the home screen pages to get to the app library

The App Library organizes all of your installed apps into categories such as social, utilities, and more. You can also search your app library to easily access any of your currently installed apps.

screenshot showing app library

If there is an app that is in your App Library and it’s not on one of your home screen pages, tap into the search box. You will get a complete list of all your installed apps in alphabetical order or you can search for a particular app.

screenshot showing an alphabetical list of the app library

If an app is in your App Library but not on your home screen, locate the app in the app library. Once you have located the app, long press on the app icon and tap on add to home screen.

Home Screen Settings

There are several home screen settings you can change depending on your preferences. Go to the Settings App, then Home Screen (Home Screen & Multitasking on a iPad). You can choose whether newly downloaded apps should be added to the home screen or only the app library and whether you want to see notification badges in the App Library. On an iPad, you will also get the option to change app icon size and whether you want to show or hide the dock. Also in iPad settings, you have the option whether you want to see suggested and recent apps in the dock. The image below is a screenshot of the iPad settings.

screenshot showing the home screen and multitasking settings screen from an iPad

Have you used any of these methods to organize your home screen? Let us know in the comments!

How to Stop Being Disturbed: Apple Edition

It’s probably happened to you at least once, it’s late and you’re just starting to fall asleep and then your phone either vibrates or chimes with some type of notification. Luckily, there are ways to easily avoid your iPhone or iPad disturbing you when you just want some peace and quiet. Android users: there will be a future post detailing how to use a similar feature on Android devices.

Apple has a built-in feature on their devices (iPhone, iPad, and Mac books) called Do Not Disturb or Focus, depending on which version of iOS or mac OS you are using. For devices running iOS 15 and later, Do Not Disturb is incorporated into the Focus app. When Do Not Disturb/Focus is active, you won’t get app notifications, texts, or calls.

Getting Started

To get started on an iPhone or iPad, go into the Settings app. Focus can be used on a schedule, or on an as-needed basis. Tap on Focus to begin.

screenshot of main focus settings

From there, you’ll see several options. If you tap on Do Not Disturb, you will get options for how you would like to use Do Not Disturb. Set up different options for general do not disturb, sleep, or when you’re at work. There is also the option to add a custom mode such as when you’re driving, working out, and more. For people who have more than one Apple device, you can share your Focus schedule across your devices. This schedule will be shared if Share Across Devices is selected.

To set up and use do not disturb on a mac, follow these helpful instructions from Apple.

Sharing Your Focus Status With Others

If your Focus Status is on and someone tries to message you, there will be a message stating that you have notifications silenced, and they will be given the option to notify you anyway, in case of an emergency. If the person messaging you taps notify anyway, you will receive a regular text notification.

screenshot of text message screen showing notify anyway

What if you don’t want to give people that option or you want to turn it off for certain contacts? MacReports has written a helpful article with instructions on how to turn off that feature or turn it off for certain contacts.

Do Not Disturb Options

Tapping on Do Not Disturb will give you various options. You can select which people or apps you would still like to receive notifications from. For those with iOS 16, you can have a different lock screen picture when Do Not Disturb is on, as well as a different set of home screen icons.

Screenshot of main do not disturb screen

Scheduling Do Not Disturb

If you’re like me and you’re a set-it-and-forget-it kind of person, you can set a schedule for when Do Not Disturb turns on each day. You can even set a different schedule for different days of the week. Simply scroll down and set up your custom do not disturb schedule.

screenshot showing example of Do Not Disturb schedule

Smart Activation is basically Apple using past device behavior to determine when you would like to activate Do Not Disturb. Diving in even deeper, you can control the behavior of certain apps when Do Not Disturb is on. For example, you can choose which messages you would like to see, select if you’d like dark mode to come on, turn on low power mode, or more.

Driving, Fitness, and More

For more information about Do Not Disturb, Sleep, and Work modes. Apple has written up a thorough set of instructions. Included in those instructions is how to set up a custom mode that can include while you’re driving, exercising, and more.

screenshot of other types of focus modes

Have you tried out Focus? Let us know in the comments!

Learn About an Easy Way to Share Items

Have you ever been in the room with someone and wanted to share something: a photo, a web link, something from an app, but didn’t want to text or email it? For Apple users, there is an easier way!

All Apple devices come with a built in feature called AirDrop. AirDrop can be found on Macs, iPhones, and iPads. AirDrop allows you to wirelessly share documents, photos, map locations, webpages, and more.

Setting Up on an iPhone and iPad

To get started, make sure that AirDrop is enabled on your device. On an iPhone or iPad, go to Settings–General–AirDrop. From there you have the option to turn receiving off, to allow only contacts to AirDrop something to you, or everyone in range for 10 minutes. Note: if you are using iOS 15 or earlier, your options will be receiving off, contacts only, or everyone. AirDrop is available on iOS 7 and later and Mac OS X 10.7 Lion and later.

Screenshot of choosing who can share things with you via AirDrop

Setting Up on a Mac

Mac users, click on the control center icon in the taskbar.

Screenshot of setting up AirDrop on a Mac

From there, click the AirDrop icon to turn AirDrop on or off or control who can send you items. To turn AirDrop off completely, click the selector in the heading. If it is turned off, you will not see the Contacts Only or Everyone options.

Screenshot of AirDrop in its on setting on a Mac

Once you have turned on AirDrop, you can send and receive items from other Apple users in the area who have enabled AirDrop.

Sending an Item with AirDrop

To send something using AirDrop, tap on the share icon. This is found anywhere something can be shared. In the Safari app, it is in the toolbar. You can share from most apps, including TikTok, Zillow, Instagram, and other places where you see the share icon. Alternatively, some apps have their own Share option. You can tap AirDrop after tapping on the share option in any app that has a share feature.

Screenshot of showing share icon circled in red

Once you tap on the share icon, you will see your sharing options. This is also an easy way to share an item via text, email, or the other options listed. Tap on the AirDrop icon. If you don’t see the AirDrop icon you may have to tap on more or the three-dot icon, depending on the app.

Screenshot showing the AirDrop icon highlighted in share options.

Choosing Who to Send an Item To

After you tap on the AirDrop icon, there will be a list of people you can send items to. If there is no one available, you’ll get a message saying no people were found. Sometimes it takes several seconds for contacts or people to appear. When there is someone nearby and they are not appearing as an option, confirm they have AirDrop enabled, and if you are not a contact, that they have “everyone” selected as an option.

Screenshot showing people you can AirDrop an item to.

Tap on their name. If the person has a picture set in their contact info, or if you have a picture set for them on your device, you will see their picture. Otherwise, it will be the grey generic person icon. You can also share with more than one person at the same time by tapping their name on the same screen. Just a reminder, AirDrop is only available for Apple users.

On the other person’s end, they will get an option to either accept or decline the AirDrop.

Screenshot showing the option to accept or decline an AirDrop request.

If they accept, you will see a waiting status, then a circle with the progress, and then a sent status. If they decline, you will see “declined” in red under their name. When you are AirDropping something to yourself between two different devices (for instance if you share a photo from your iPhone to your Mac), you won’t have to click accept. It will automatically be shared. A website will open in Safari, a picture will open in the Photos app, and shared items from other apps will open in their respective apps. If an item is being shared from your iPhone or iPad to your Mac, by default, it will go into your Downloads folders.

Have you tried AirDrop? Let us know in the comments!

Easily Search For an Old Facebook Post

Have you ever wanted to find a specific post on Facebook, but didn’t feel like scrolling and scrolling through old posts to find it? Fortunately, there is an easier way.

You can easily search for a specific word or phrase on an individual’s profile or on a page or group. To begin, go to the profile, page, or group where you would like to search.

Searching a Person’s Profile

If you are searching from an individual’s profile, click on the three dots on the top header of their Facebook profile, and then click on search. If you are on the mobile app, there should also be three dots when you visit a person’s profile.

Screenshot showing menu icon on the top right, revealing search as an option

Next, a box will pop up where you can enter your search term to find posts, photos, and tags.

Screenshot showing the search box at the top

Once you’ve typed your phrase and hit enter or clicked search, you will see a list of results, if there are any. On the left side of the screen, there are options to filter your results. There is also a filter button on the mobile app.

Screenshot showing the filters in the left menu of the desktop app

Searching a Page

To search on a page rather than an individual profile, in some cases, there will be the same three dots you can click and follow the same process. If you don’t see the three dots, there should be a magnifying glass in the same area on the page. There may also be a button with a picture of a magnifying glass with the word search next to it. On the mobile app, when you visit a particular page, look for the three dots to search.

Side by side screenshots showing the page search with and without icons, including a magnifying glass, to the left of the menu icon

Searching a Group

You can also search for a specific post within a group you are a part of by going to the group and clicking the magnifying glass icon. On the mobile app, you can search a particular group by visiting the group and clicking the magnifying glass on the top row. When you tap on it, there will be “Search in [group name]” in the search box.

Screenshot showing the search box at the top showing a group name and an option to search posts you've seen or all of Facebook.

Have you tried out the search feature? Let us know in the comments!

Don’t Get Locked Out of Your Apple Account

If you’ve ever forgotten a password, you know how frustrating it can be if you don’t have a backup method to access your account. Luckily, Apple has set up a way to easily get back into your iCloud account if you forget your Apple ID password.

frustrated phone user with her hand on her forehead

Apple allows you to set up an account recovery contact. An account recovery contact is someone who can verify your identity and help you regain access to your account and all of your data if you ever get locked out or forget your password.

In order for someone to be your recovery contact, they will need to have iOS 15 or later on their iPhone, iPadOS 15 or later on their iPad, or macOS Monterey or later on their Mac. They will also need to meet other requirements.

When choosing an account recovery contact, pick someone you trust. Once you have set up a recovery contact, if you get locked out of your account or forget your Apple password, simply contact your contact. From there, you can give them instructions on how to generate a six-digit code that they can share with you. This code, along with other information the contact will verify, will allow you to reset your password and regain access to your account and your data.

For detailed instructions on how to set up a recovery contact, please follow the instructions on Apple’s website. Do you think you’ll use this feature? Let us know in the comments.