The East Greenbush Library provides technology help in a variety of formats. We conduct classes, offer one-on-one assistance by appointment, post help videos, and have a page dedicated to online help articles and videos gathered from vetted websites around the internet. Did you know we also have a subscription resource available to our patrons with great articles, videos, and webinars for users of all skill levels? Whether you’re a technology pro or you’re just getting started, Tech-Talk has something for everyone.
While we’ve featured Tech-Talk and some of their articles before, this time we’ve made a quick video to highlight how to find what you are looking for in Tech-Talk. Can’t find what you’re looking for? You can submit requests for future articles and videos on whatever tech topic you need.
If you’d like to receive a weekly quick tip from Tech-Talk in your inbox, along with information about upcoming webinars, sign up for the Tech-Talk newsletter on the main page.
Have you tried Tech-Talk yet? Let us know your thoughts in the comments.
Have you ever been researching a purchase and found a product whose reviews are too good to be true? Or read a review that was so general it could have been anything? Chances are, you’ve seen some fake reviews in your time. How can you tell if a review is real?
The folks at Wired have already written a great article on this subject, and I’d encourage you to read it. They have done a fantastic job of listing possible red flags and showing you how to get the most recent reviews for a product.
Use Fakespot to Automate Checks
If you would rather not pick through reviews manually, there is a service called Fakespot that can help. You can open the Fakespot analyzer page and copy/paste the URL for each item you’d like to check, or you can install an extension in Chrome or Firefox from the Fakespot home page (scroll halfway down for the link).
I was using Firefox, so the middle of the home page offered the Firefox extension.
If you are using a mobile device, you can download the app version for iOS or Android.
How Does Fakespot Work?
Fakespot uses artificial intelligence (AI) to spot red flags and suspicious patterns that may or may not be obvious to human observers.
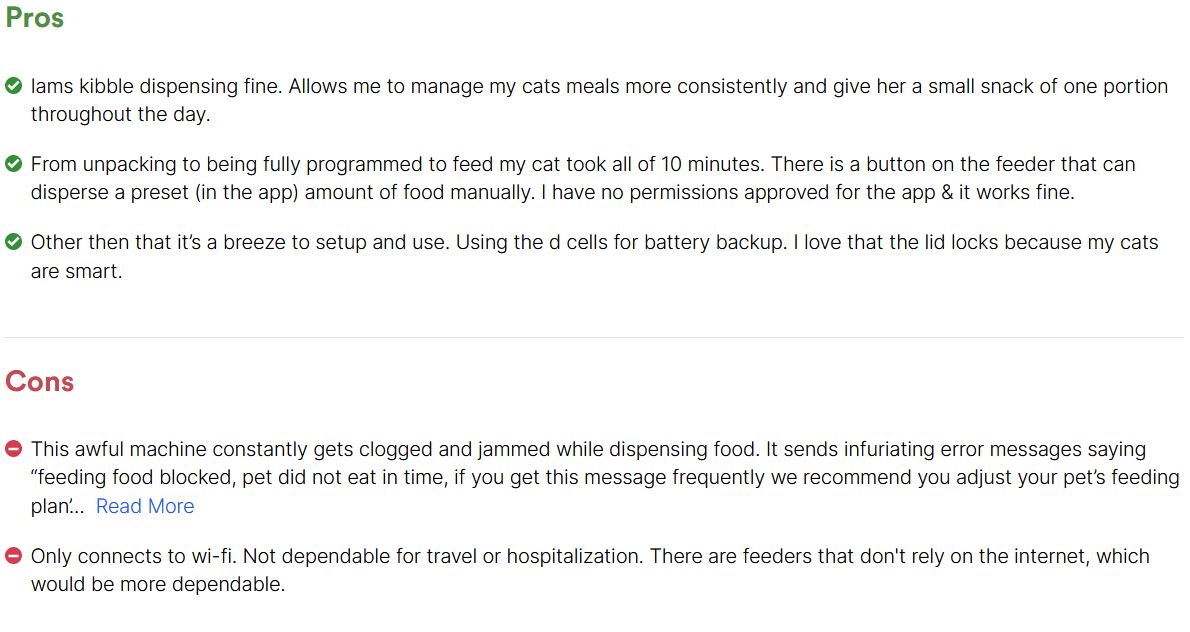
To test it, I pasted a link for an automatic cat feeder I found on Amazon into the Fakespot analyzer page. Not only did it give me an overall grade for the review quality, but it also picked out some of the most helpful information that was buried in all those reviews. Here are some screen shots from the results page:
Under the “B”, notice that Fakespot adjusts the Amazon rating based on how reliable the reviews are.Some pros and cons culled from the reviewsSome more tidbits are found in the “highlights” section
Other available information includes an overview of how reliable the reviews are, the most positive and negative reviews, seller warnings, and other helpful insights.
If you decide to install the browser extension, using Fakespot is even easier. It automatically adds insights on the selling page itself:
Fakespot’s grade is above the price
Link to highlights below item title
Note: When installing the app or extension, you may be prompted to give permission for app to know your email. This allows you to save settings without an account. You may be prompted for permission to read or change data on sites you visit. This is so Fakespot info can be added to a site that isn’t already supported (see below).
Limitations
Keeping in mind that AI technology is not infallible, Fakespot can be a great tool to help you spot dodgy sellers and items using fake reviews to boost sales. While the tool is not compatible with all e-commerce sites, it does automatically cover:
Amazon™
BestBuy™
Sephora™
Steam™
TripAdvisor™
Yelp™
Walmart™
To use the browser extension on sites other than these, you will need to give your browser permission to edit the page, as mentioned above.
Summary
Fakespot is an awesome free tool for automating the vetting of online reviews. With Black Friday coming up in a couple of months, would you be inclined to use this tool?
Even if you have unlimited data on your smartphone, nobody has unlimited space. Gone are the days when all manufacturers would include an SD card slot to allow you to expand your phone’s storage (though a couple still do). Many of us use cloud services to back up our photos, but we rarely remove them from our phones unless we have to. Every time I check, I’m surprised at how cluttered my folders are with memes and screenshots I only needed for a moment. Let’s not even start with all of the PDF documents that need to be downloaded before viewing. Digital clutter is just so easy to ignore until you get a warning that your storage space is low. Or worse, that awesome video you just took can’t be saved.
General Considerations
No matter which brand of smartphone you have, there are a few general suggestions that can help free up space.
Do you need all of the apps you have on your phone? If not, go ahead and uninstall them. If you only need an app occasionally, you can uninstall it and download it again later.
Are some of the apps you use available as a website? If so, you can bookmark them or add shortcuts to your phone that takes up a lot less space than an app.
If you regularly create screenshots or download memes to post, image files are a great place to find content that is easy to delete.
If there are files you need, but you don’t need them on your phone, consider transferring them to a computer or hard drive. Cloud storage is wonderful, but some of the platforms will delete a file from the cloud when it is deleted from your device, so it can be tricky.
Are any of your images or videos duplicated? I often have to resize things before sending, so my phone is full of duplicate copies. I save a ton of space by culling the extras.
Remember, any image or video you post on social media is saved there and can be downloaded in the future.
High-resolution images take up a LOT of space, and you rarely need an image with that sort of resolution unless you are a professional/hobbyist photographer whose images will go to print. Optimize your images to keep them on your device at a smaller size. See your phone’s section below for instructions.
Are you saving music on your phone? If you don’t like the idea of paying for streaming services, YouTube Music will let you upload up to 100,000 tracks from your computer that you can stream as long as you have an internet connection. Only things you need to hear when offline would need to be saved to your phone storage.
Old text messages and voicemails take up space, too. Delete anything you don’t need to free up additional space.
Like a browser, your phone has a cache that collects information and takes up more and more space over time. How-to for iOS | How-to for Android
Don’t forget to clear your browser cache.
Both app stores have apps that claim to clean up your phone for you. In general, it is a good practice to avoid these apps. At best, that’s giving an app a lot of control over data you care about. At worst, you could lose your data and your phone could be bricked.
Cleaning Up iPhone Storage
To do a deep dive into your iPhone’s storage, open Settings>General>iPhone storage. The color-coded bar chart shows file categories and how much space each file type is using. Under the chart, your iPhone will offer suggestions for cleanup. Below the suggestions, you can find detailed information about how much space each type of file is taking. The app section will allow you to delete apps with a single tap.
In the section above, I mentioned that high-resolution photos can take up more space than needed. Navigate to Settings > Photos, where you can enable the “Optimize iPhone storage” option to get those files under control.
You can also reclaim space by clearing your browser cache. For Safari, go to Settings > Safari > Clear History and Website Data. You can do this in other iPhone browsers, such as Chrome, too.
Cleaning Up Android Phone Storage
To do a deep dive into your Android’s storage, open Settings > Storage. If you have a Samsung Galaxy phone, you may find it under Settings > Battery and device care>Storage. Your storage usage is broken down by categories. Click on a category for details. As you drill down, you will find you can long-press on individual files to delete or tap an app name to uninstall it. If your phone has a “free up space” button, you can tap it to view a list of files that may be likely candidates.
To optimize your photos, open the Google Photos app and go to the settings. Select “free up space” to back up your photos to your Google account and free up space on your phone.
Android allows you to not only clear your browser histories, but also the cache and data from every app on your phone. To do this, go to Settings > Storage > Apps and tap an app name. I chose Adobe Acrobat for this example.
Choose “clear cache” to delete temporary files and history.
Clear storage will remove all information, including account login, and return the app to a like-new state.
It won’t make or break your storage size, but regular maintenance will save some space and make your apps run more smoothly.
Summary
With a little effort, you can reclaim enough space on your phone to avoid storage warnings and tough file-saving choices without resorting to shady apps in your device’s app store. Do you have any additional space-saving strategies? Let us know about them in the comments.
You may remember the free browser image tool PixlrX from my post about using it to resize images easily. I have used it to create images from scratch, but I find it very similar to the free version of Canva. Because the library has a Pro subscription to Canva, I tend to use that platform for the additional features.
If you do not have a pro subscription to Canva, you may want to consider Pixlr X as your main image creator and editor. In addition to all of the typical features you would expect, it also has some pretty great effects available. Check out these TechConnect videos created by New York Public Library that demonstrate how to use some of these enhancements.
Humans weren’t designed to look at TVs, computer monitors, and smartphones all day. Now that our lives tend to revolve around these devices, digital eye strain has become a widespread issue. Symptoms of digital eye strain include itchy/burning eyes, blurred vision, or even headaches after using a device.
As an IT professional, eye strain had become a daily occurrence for me. I believed if I could just soften the brightness or shift the color of the screen, my eyes wouldn’t feel so assaulted by it. I also found that my optimal monitor brightness changed throughout the day, depending on the brightness of the room. Messing with my monitor settings didn’t help, so I went looking for a software solution.
Enter F.lux
F.lux is a free, lightweight utility that can control the display “warmth”, and thereby brightness. Corporate site licenses are available for Windows machines, but they are only required if your IT admin wants to control the installation and settings. F.lux is available for Windows, Mac, Linux, iPhone/iPad, and Android. It can be used in one of two ways:
Enter your location and the type of lighting you have, and let f.lux adjust your display automatically throughout the day
Change the brightness or warmth of the display to a single comfortable setting that remains constant all day. This is what I do since I spend most of my screen time in a room with fluorescent lighting where the time of day does not affect my ambient brightness.
Using F.lux
For the purposes of this article, instructions and screenshots refer to the Windows version of the software. During installation, you will be asked for your location. This information will help f.lux determine the kind of natural light you get and what time it is where you are.
After installing F.lux, you will find it in your taskbar on the bottom-right of your screen. In this image, it is the icon immediately to the right of the arrow:
Click the icon to open the tool. Here is how mine looks:
Because I knew I wanted the same warmth/brightness all day, I simply dragged the white button on the slider until the display looked more comfortable to me. The other information on the screen would suggest that the time of day is involved in the settings, but if you look in the upper right, the status is “warm all the time.” This means my setting stays the same all day.
If you want your warmth/brightness to change by time of day, click the orange dot next to the Circadian response percentage. This will convert the single slider into three sliders that can be set independently:
After setting the sliders, you can click in the circadian response area to get a time lapse 24-hour preview of how the display will change over the day. If it’s not what you’re looking for, try adjusting again.
The Menu
For most folks, that would be enough configuration to make a world of difference. If you would like to dig deeper and discover more adjustments. If you have smart lighting in your home, you will definitely want to check out the “options and smart lighting” section.
If you use dual monitors like I do, getting both monitors to change can be tricky. If you only have one monitor showing the change, go to Settings>System and try duplicating the monitor display or changing which monitor is primary. Often, changing one of these settings will trigger f.lux to make both displays the same. Afterward, you can revert the settings to the way you had them and both screens should remain matched.
Other Resources
While F.lux is a great tool and using it on all of your devices will definitely reduce eye strain, there are other steps you can take to reduce eye strain, such as wearing blue light blocking glasses. Cornell Cooperative Extension of Rensselaer County has put together a video and an article that offer additional strategies for reducing eye strain. What are your favorite methods for battling eye strain? Let us know in the comments!